tag:blog.jesseseay.com,2013:/posts the spaces in between 2023-03-14T14:22:48Z Jesse Seay tag:blog.jesseseay.com,2013:Post/1950555 2023-03-13T22:07:49Z 2023-03-14T14:22:48Z Mechanical Tide: automating kinetic sculpture

Last fall the University of Chicago contacted me about my kinetic sculpture, Mechanical Tide. The piece had entertained visitors in the lobby of the Physics Department since 2008 but they were renovating the building and now it needed to find a new home. So we arranged for them to move the work to Pumping Station: One, where I could give the piece a tune-up and cleaning, before sending it off to its next venue.

The piece arrived in January and I was delighted to find that the movers hired to pack and transport the work from U of C were quite familiar with it. One told me that he had done a number of moves for the school in the past, and would wait for appointments in the lobby where he could watch the piece run and enjoy the free Tootsie rolls put out for visitors. 

Once we had it unpacked, I got to work: resetting the controls, refinishing the wood, and a bit of tinkering to improve the ball movement. Much thanks to Joe Mertz, the creative fabricator behind Amalgam Incorporated, who lent his considerable expertise to the entire enterprise. 

The piece is meant to be viewed from above, a gently tilting table covered with ball bearings, continuously rolling back and forth. Underneath the sculpture is the automation: a hefty motor rotating an arm that lifts and lowers the table.

The speed of the table's movement is controlled by a potentiometer on the side of the white control box. The piece looks particularly cool when the movement is slowed down: the rolling of the balls is more gradual and staggered. But if it's turned down too low, the motor does not get enough electric current to start. There is an audible hum from the motor, but no movement. So the pot needs to be turned up a little (clockwise).

A custom built cam affixed to the motor's shaft, "tells" the piece what position the table is in. The cam, which has a notch in it, rotates as the motor raises or lowers the table. When the table is fully lowered, the notch triggers a microswitch. When it is raised, the notch triggers a second microswitch.

When the microswitches are triggered, they each send a message to a bright orange Ametek TMM timer and the timer's "1-shot" mode pauses the motor, for a programmable number of seconds.

A motion detector (disconnected in the photos) turns the piece on when it detects passers-by. This conserves energy when no one is present. The length of time it remains on is selected by a switch on top.


We'll be moving the piece to a new venue, very soon. Stay tuned!

]]>
Jesse Seay
tag:blog.jesseseay.com,2013:Post/1920467 2022-12-25T17:28:31Z 2022-12-26T17:06:14Z Merry Circuits

I taught my classes how to make custom pcb in KiCAD this fall. One of my students, Dom Frugoli, ended the semester with PCB holiday cards (complete with silkscreen family portrait and Krampus).

Happy Holidays!


]]>
Jesse Seay
tag:blog.jesseseay.com,2013:Post/1911731 2022-12-03T19:18:17Z 2022-12-03T19:18:17Z How do you grade a circuit board?

Photo: auto-wah circuit by Izaak Thompson

When I first started assigning circuit board projects, I couldn't find much material online about how to grade a circuit board, so I devised my own rubric.

I found the quality of student work improved significantly once they had the Build Checklist and could see how it was weighted in the grade.

The photo: my student Izaak Thompson devised and completed this circuit for his auto wah pedal project in my advanced Building Circuits class in 2020. Since the class was entirely online due to the pandemic, students had to submit photos and video of their assignments. It was an advanced class so all of them had previously taken the pre-requisite electronics class in-person before the pandemic started; I think that experience prepared them to do this course at home.

On a side note, the pandemic is how I discovered that one can troubleshoot circuits surprisingly well just by looking at photos-- the hardest part is making sure the photos are well lit!


]]>
Jesse Seay
tag:blog.jesseseay.com,2013:Post/1896886 2022-11-26T23:02:53Z 2022-11-26T23:02:53Z Red Rubber Bands at Waubonsee Community College

Waubonsee Community College recently invited me to install my work in a lovely art project space located in the Dickson Center. 

Red Rubber Bands was on display from September 8 - October 20.


]]>
Jesse Seay
tag:blog.jesseseay.com,2013:Post/1895244 2022-11-01T17:00:00Z 2022-11-19T18:52:16Z Artist Talk at Waubonsee Community College

Photo Credits: Tonya Whitlock

I recently visited Waubonsee Community College to give a talk to Debra Kayes Halpern's Design students, sharing some of my knitted circuitry and discussing my sculpture installed at the college. Waubonsee had invited me to do a hands-on workshop with the students but the course was in an art room without any electronics tools so I couldn't introduce them to the joy of soldering or breadboarding.  Instead, we made Throwies, a brilliantly simple form of electronic graffiti invented by the Graffiti Research Lab at Eyebeam.
Throwies require zero tools and minimal materials. Tape the LED to the battery, then tape on a rare earth magnet. Find a public space with metal infrastructure (a bridge? building pipes?) and toss your Throwie till it sticks. We tossed our around in a black box theater on campus.

***Fun fact: the LED doesn't need the standard protection resistor in this circuit because the coin cell battery's internal resistance prevents it from delivering enough current to damage the LED.
]]>
Jesse Seay
tag:blog.jesseseay.com,2013:Post/1709230 2021-07-01T19:41:47Z 2021-07-01T19:41:47Z Student Projects from AUDI 413 Building Circuits
For Columbia students, there's still a few seats available for this fall's class. We are waiving the AUDI 313 pre-requisite. If you've taken AUDI 104 or have electronics experience, that's enough. (Just email me if you want to register.)

These videos are from the Fall 2020 section

You can find a bunch more students projects, from different semesters, on my youtube channel.

Class is online this fall but there will be the option of weekly In-Person workshop time.


]]>
Jesse Seay
tag:blog.jesseseay.com,2013:Post/1453541 2019-09-17T19:04:18Z 2019-09-17T19:22:20Z Two books featuring my work

Foundations in Sound Design for Embedded Media, edited by Michael Filimowicz.

I contributed Chapter 2: The Electronics of Microphones and Loudspeakers. This allowed me to revisit in-depth the technical material I was exploring when I did my textile loudspeakers. The book features the work of 25 authors, with far more impressive biographies than my own. I'm enjoying reading their contributions on the subject.

Fabric and Fiber Inventions by STEAM educator Kathy Ceceri. I'm thrilled to be featured as a "Fabric Inventor" on pg 116-117. 

]]>
Jesse Seay
tag:blog.jesseseay.com,2013:Post/1303965 2018-08-01T00:30:00Z 2018-08-06T14:53:35Z New electronics courses at Columbia College Chicago

This year I've been busy managing the explosive growth of Columbia's Electronics-For-Audio curriculum. What started as a single elective course is now a 3-course sequence! 

The Audio Department's little electronics workshop previously served about two dozen students a semester. This spring, we had almost a hundred! We hired several new adjunct faculty, and an incredible team of teaching assistants who helped me keep 8 sections running smoothly. It's clear that we're outgrowing our current digs, so I'm also working out plans for some serious upgrades for the coming year. Change is afoot!

photos: Phil Dembinski

Here's the new lineup:

AUDI 104: Audio Electronics (pictured) The first, intro-level course, Audio Electronics, is now a part of the required "core" course sequence for majors. Students build stuff from scratch, like this loudspeaker from a plastic cup. They also build circuits using Snap Circuit kits, which are great for small group activities. (This is what's happening in the photographs.)

AUDI 313: Building Circuits for Modular Synthesis with Logic Gates After completing Audio Electronics, students can follow up with this elective on building circuits for analog synthesis. We build a number of projects from Nic Collins' book, Handmade Electronic Music. (I'm still kinda working on the course name for this one. I think I overdid it when the college said "More descriptive course names, please". )

AUDI 413: Building Circuits with Pick-Ups and Pedals This advanced class focuses on op-amps and pickups. It also fulfills a senior course requirement. Since students take the introductory class as a pre-requisite, they'll be able to get a lot further, a lot faster, in these two follow-up classes. 

The videos feature my Spring 2018 advanced students, in an improvised performance at Columbia's Manifest Urban Arts Festival this past May. I'm so proud! They built most of the hardware themselves: springboard instruments (inspired by Eric Leonardson), contact mics, spring reverb units, fuzz pedals and pitch trackers. Plus, checkout Rachael's "squarinet"-- that's a square clarinet-- that she built for her Physics of Musical Instruments course with Professor Dave Dolak.

Student Performers: Rachael Cowell, Vito Di Beasi, Hunter Funk, Aaron Gelblat-Bronson, Mac Kelley, Derek Muhl, Nick Novak, Isaiah Quino, Sky Roessler, Daniel Vega


]]>
Jesse Seay
tag:blog.jesseseay.com,2013:Post/1183751 2017-08-21T21:30:00Z 2018-01-15T18:29:30Z Hola, SIGGRAPH! or How to do an e-textiles workshop for 50 people

I was invited to give a workshop with my knitted sensors on August 2nd at SIGGRAPH 2017, a huge computer graphics conference in Los Angeles.  It went great-- everyone's knitted sensors were up and running in just over an hour! 

Hands-on workshops require a lot of planning. People progress at different rates and can get impatient waiting for each other or for assistance. Too much waiting and the workshop loses momentum.  

So I like to work with small groups. I move around to offer assistance, and encourage people to help themselves to materials and progress at their own rate.

This wasn't going to work at SIGGRAPH-- the classroom was spread out with no middle aisle. And I'd be wearing a body mic. If I walked in front of the speakers, I'd set off ear-piercing feedback (which I did, twice, oops...). Plus... I wanted to give people sleeves that fit their hands but there was no way to measure hand sizes of participants ahead of time.

So we had to get creative with solutions.


Dylan responds to a post-it note call for help.

There wasn't room for participants to get their own materials, and asking for help would slow the presentation down. So I gave everyone bright yellow post-it notes. If they needed something, they wrote it on the post-it, attached it to top of their computer monitor, and one of our volunteers would sprint over to read the note and help or retrieve materials.  Worked great!


Ziploc full of goodies

Materials were distributed to each workstation in baggies, in advance, thanks to workshop coordinator Brittany Ransom. Plus, we put a pdf of the powerpoint presentation on each computer's desktop (see below). I invited people to use it to progress at their own rate.
 
Sewing diagrams

I tested out the activity with the volunteers ahead of time, and realized that tech people were going to struggle with sewing the wires in place. They needed sewing diagrams! Luckily I had time to add a few. We didn't have to worry too much about the knot because we had Fraycheck-- a fabric glue. And glue makes sewing seem easy!

I also made diagrams on Fritzing for the breadboard connections--super helpful.

Fits like a glove

Instead of sizing participants, everyone randomly received either a 10x30 or 12x40 size-sleeve on it (with the size labelled). I figured this would get the right size into the hands of at least half the attendees. I invited people to swap with their neighbors or flag us down to request another size. (I also brought 10x40 and 12x50 sized sleeves.) I was surprised to find that only a few people requested another size.

The one thing we didn't pass out in advance was the resistors. In order to get the best range from your sensor, it's important to match it with an appropriate fixed resistor. But the resistance of the sleeve depends on how it fits the wearer.  So I had everyone measure their sleeve resistance and write it on a post-it. The volunteers picked up the post-its, and passed out appropriate resistors.

In preparation, I had taped the resistor packs onto a large cardboard backing with the values labelled. During the workshop, it was easy for the volunteers to grab the exact resistor they needed to "fill the order" on each post-it.

 
Materials for Knitted Finger Sleeves
Resistive yarn (80% polyester, 20% stainless steel)
Snaps #199 10 Line (6.9 mm), nickel finish
Striveday silicone coated stranded wire AWG 26
Male crimp pins  these are great for breadboarding
tapestry needle
yarn for sewing wire
Dritz Fraycheck

Also used:
Breadboards
Hookup wire
Arduino uno
piezo discs
resistors
multimeters
scissors

My tools (used to knit the sleeves ahead of time and attach wire with snaps)
Superba Knitting Machine
Snap Press Machine (with punch/die)
Crimp tool (I use Engineer Inc PA-09 crimping pliers )

img: Tesia Kosmalski


]]>
Jesse Seay
tag:blog.jesseseay.com,2013:Post/1175190 2017-08-19T19:30:00Z 2018-01-15T18:29:46Z Improving Arduino sensor range


Adding a fixed resistor ½ the value of a variable resistance sensor improves Arduino performance.


Whenever you connect a 2-lead variable resistor (VR) sensor (like a photo cell or bend sensor) to an Arduino, you add a resistor to it. I did this with my knitted stretch sensor. It creates a circuit known as a voltage divider, which controls the voltage level, based on the relative resistance of the resistor to the sensor. This is important because the voltage level is what AnalogRead "reads" in Arduino.

I wondered what value would give the best performance for my knitted sensors. So I used the equation below to calculate the output range of voltage dividers, based on the ratio between R1 and R2, given that R2 is my knitted sensor and R1 is the (unchanging) resistor. I graphed the outputs for each VR value at 0%, 25%, 50%, 75%, and 100% of its maximum range.
]]>
Jesse Seay
tag:blog.jesseseay.com,2013:Post/1159411 2017-05-31T23:58:24Z 2017-05-31T23:58:24Z Recipe for Student Feedback (homemade, from scratch)


My advanced class made spring reverb units this semester. Steve and Connor stacked theirs together with a homemade tone control and a hefty dose of feedback.


Ian attached his contact mic to a jar for a duet with his sequencer. He also installed his entire rig in an old stage monitor case.


Trevor, Andy, and Brian, plus some really sweet synth.


Daniel, Rachel, Robert, and the joy of three sequencers on one clock.

]]>
Jesse Seay
tag:blog.jesseseay.com,2013:Post/1136478 2017-03-07T01:55:29Z 2017-07-15T20:34:08Z Finger Sleeve Sensors

I made these knitted sleeves from a conductive yarn that changes resistance as the knit is stretched.

Jenna Boyles, Kyle Werle, and Christine Shallenberg beta-tested the sensors at Pumping Station: One. They selected sleeves for fit, then stitched on the wires themselves. Kyle and Christine were able to use the sensors to control an analog synth and a processing sketch.


Knitted Finger Sensor from Jesse Seay on Vimeo.


With this project, I wanted to design a glove that could be machine-knit for workshops cheaply and quickly, making a wearable bend sensor available to people with no textile skills.

I decided to go with a modular approach (individual sleeves instead of single glove) because:

  • gloves are not easy to knit by machine
  • fit is important, as the tightness of the knit impacts the resistance. The tighter it is, the lower the resistance.
  • there is no one-size-fits-all with gloves. individuals with the same hand width might have very differently-sized digits

With a range of sleeve sizes, users can select the sleeve with the best fit and resistance range for each digit. We attach flexible silicone wires by means of a snap press, and the wearer then sews the wire in place with a tapestry needle and yarn -- very easy!  Transferring the sewing to the end-user means I can produce a batch of these more quickly for a workshop. Once the sleeve is finished, the user can use the tapestry needle to easily sew the wire leads in place along a fingerless glove.

Resistance varies by user. Everyone could reduce the resistance to less than 100 Ohms by curling up their finger. We were generally able to get a maximum resistance of at least 5k with a tight fit, to 20k or 30k for a more comfortable fit. The shorter the sleeve, the lower the highest possible resistance. Longer sleeves had much more range.

The sleeves are knit on a Super S48 double bed machine. Both beds are at tension 10, with a bed gap of 4. The sleeves are circular knit, with cast on/cast off using waste yarn, then finished by hand stitching. The sleeves should cover most of the finger, but are not intended to cover the fingertips.

Sizing:

Sizing has been a challenge with this project and it took some experimenting to get a useful range of sizes. For workshops, I need to be able to knit sleeves of the appropriate size ahead of time, based on a single hand measurement submitted by a participant.

I tested the sleeves for fit and resistance on a dozen volunteers at Pumping Station: One. From that, I created a sizing chart, in order to offer a range of sizes, based on hand circumference.

]]>
Jesse Seay
tag:blog.jesseseay.com,2013:Post/1102829 2016-10-27T21:06:53Z 2016-10-27T21:06:53Z Wear-a-Circuit Workshop

2016-10-27-13-26-38-self-portrait

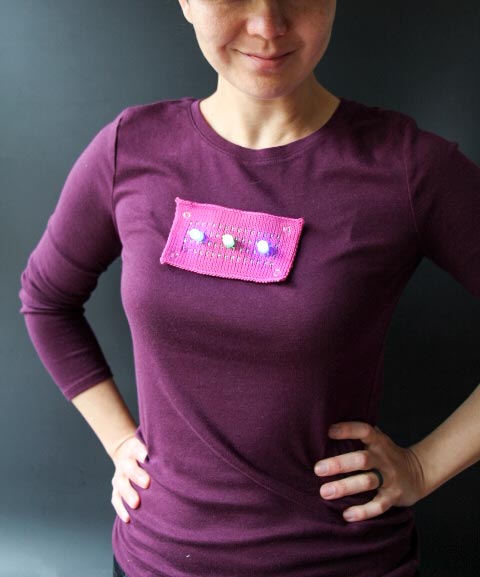
Circuit Patches are wearable circuit boards made from knitted yarn and wire. I'm doing a workshop Sunday using these. Check it out!

I use a knitting machine to make the patches, and add snap buttons with a snap press. Now the circuits can be attached to anything-- no sewing required.

Rapid prototyping for Wearables!

2016-10-27-patches-on-13-35-11

2016-10-27-3-patches-dark-13-32-00

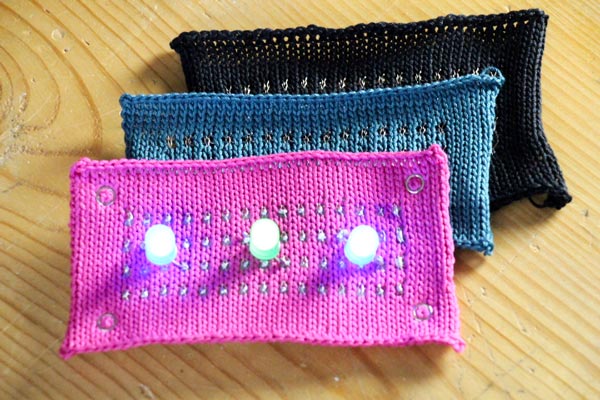
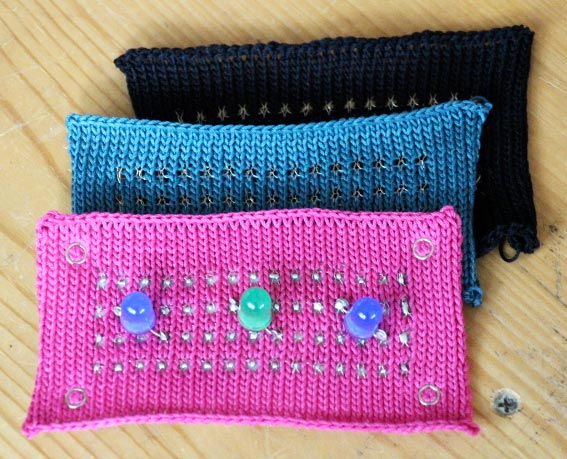
I made these circuit patches for my upcoming workshop. Participants will receive a 3" x 5.5" knitted proto-boards in black, pink, or teal. Solder LEDs and a battery on it, and you can add lights to your clothes, just in time for Halloween.

Of course, there's lots of things beyond LEDs you could add, and I'm hoping to do workshops for interactive circuits using knitted protoboards soon.

I've made a number of circuits with this method so far, usually in black. For this workshop, we're adding some fun color: circuit-board-teal and... pink! I  couldn't resist adding 10mm gumdrop LEDs to the pink protoboard pictured above.

We'll have some of those jumbo LEDs for the workshop, but also smaller ones in blue, yellow, red, white. I've even got some color-change and flicker LEDs.

If you'd like to participate, please RSVP. Hope to see you Sunday! (Bring a shirt or a hat or a bag so you can add snaps to mount your circuit on it.)

2016-10-27-snap-press-13-44-37

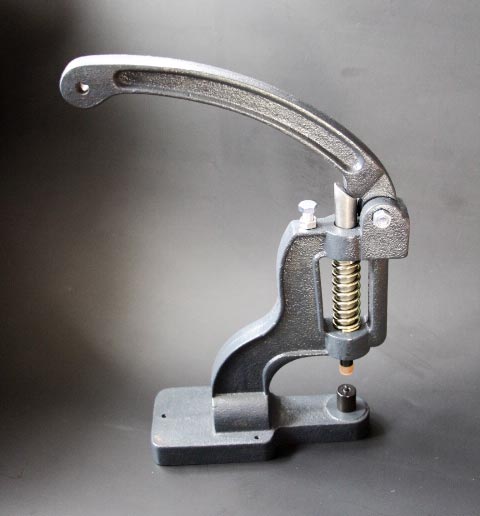
My new favorite machine: the snap press applies snap buttons without sewing.

]]>
Jesse Seay
tag:blog.jesseseay.com,2013:Post/1069498 2016-09-05T15:00:00Z 2018-01-15T17:32:25Z Snapshots from Japan

I spent a month in Japan this summer. Here are things I want to remember and places I want to return to.  Read on for contemporary art, textiles, craft, electronics and a makerspace. 

]]>
Jesse Seay
tag:blog.jesseseay.com,2013:Post/1056920 2016-05-29T04:23:57Z 2016-05-29T14:24:05Z Super Simple Sequencers

My students presented their final projects on a street corner this semester: sequencers and voltage controlled oscillators.

Read on for a sequencer project layout guide (and more fun video!)


]]>
Jesse Seay
tag:blog.jesseseay.com,2013:Post/1029828 2016-04-09T18:21:02Z 2016-04-09T18:21:02Z Simple LED tricks I created these circuits for Chicago Art Department's Crystal Ball Fundraiser Auction. The top two bidders will receive their choice of design as a custom fit cuff bracelet.

Candle flicker LEDs are an easy way to add movement to your lights, without a microcontroller.
Wire the flickering LED in parallel with non-flicker LEDs and they will alternate flickering. Make sure the different LEDs have similar forward voltages, otherwise some might not light up at all.


Slow-Fade RGB LEDs offer another easy trick, cycling through a rainbow of colors. It looks very cool set off by single color LEDs. If you limit the current enough with a high resistor, some of the LEDs will go dim at different points in the cycle.


With the above circuit, I slipped a piece of resistive velostat under the battery contact, as a dimmer. Without it, all 3 LEDs remain on, continuously.


]]>
Jesse Seay
tag:blog.jesseseay.com,2013:Post/1012908 2016-03-13T15:59:30Z 2016-03-14T19:15:43Z Passap Knitting at Pumping Station: One

IMG_0291

Aushra knits on the Passap

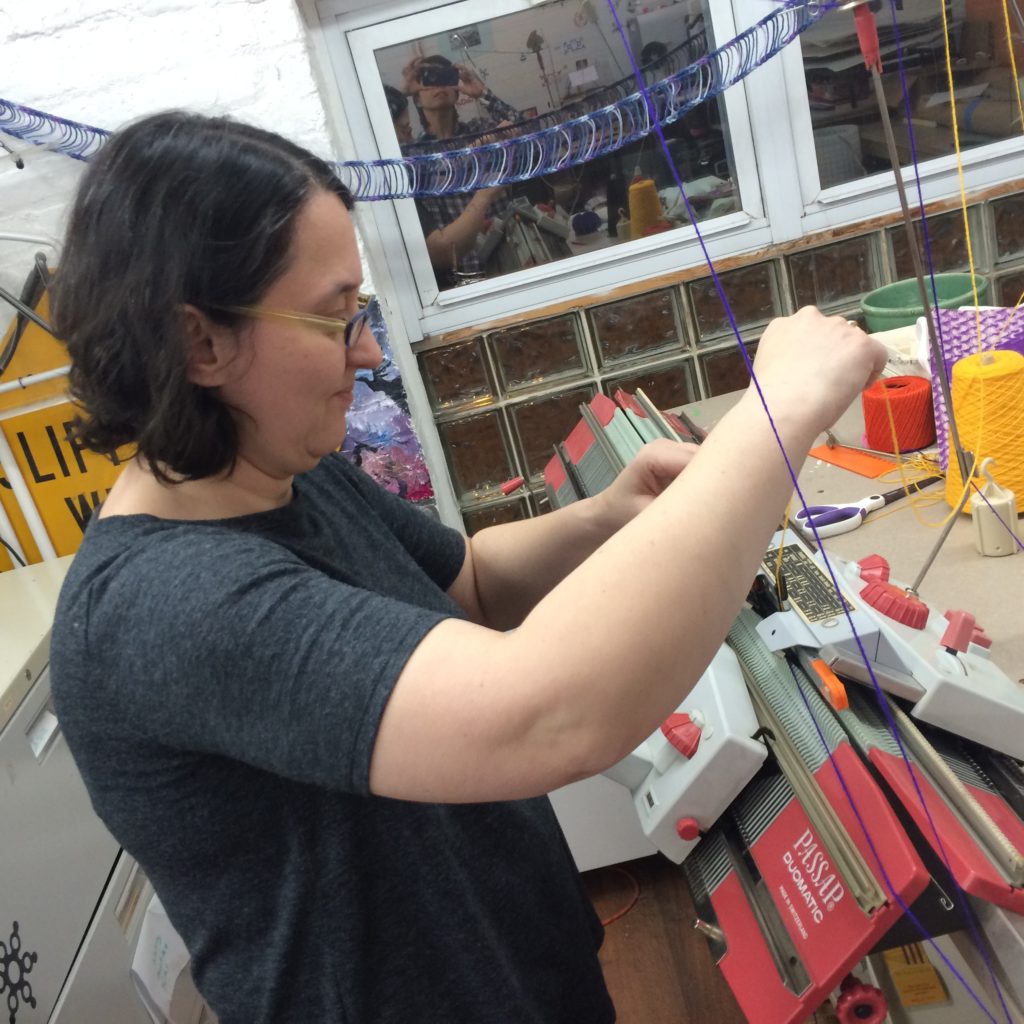
2015 was the year of the Donated Double Bed: two Passap Duomatics and a Superba S48. I had no experience with either brand, so it's taken awhile to get one working and online. There was cleaning and repair (tag-teamed with Dan, Erica, and Will), designing and building a worktable (thank you, Shae!), followed by the scavenger hunt for missing parts (props, Katrin and Richard!).

But I'm pleased to report it's finally happening! At a recent "Knitting Machine Office Hours" at Pumping Station: One, we tested settings that work with the Passap using fingering weight Tamm 3-ply Astracryl yarn. And we figured out how to knit from cones (no cake winding required)! Read on for a complete step-by-step.

]]>
Jesse Seay
tag:blog.jesseseay.com,2013:Post/968877 2016-01-13T21:30:18Z 2016-01-13T21:33:48Z Felting Yarn I first knitted with Yeoman Felting Wool last summer, when Yeoman donated a large box of yarn to the eTextiles Summer Camp. It's easier to hand-felt than other wool yarns I've tried, so I ordered a half dozen colors and started to play. It's fun to make detailed colorful designs, and perfect for holiday gifts. But there are a few pitfalls in creating your design. Read on for info about:
  • holes between colors
  • uneven felting due to pattern and color
  • felting technique
Holes

The designs pictured are "single motif": the pattern does not repeat and the contrast yarn stitches are wider than 5 stitches in a row. This results in long "floats" of yarn on the back side. Normally you'd "wrap" the edge needles while you knit to avoid big gaps caused by the edge stitches "laddering." Instructions for this are often included in machine manuals under "how to knit single motif". 
The edge needles are not wrapped in this piece. This resulted in laddering: large gaps and sagging stitches at the edge of each color. This is particularly visible around the brown in the middle.
]]>
Jesse Seay
tag:blog.jesseseay.com,2013:Post/899230 2015-08-30T20:27:57Z 2015-09-03T16:24:04Z Knitted circuit: blue rectangle, orange line

I crafted this small circuit from bus wire, solder, SMD LEDs, resistors, transistor, and an ATTiny45 IC.

I programmed the Arduino to create the flicker effect and fade out, and used shellac to isolate the bus wire where necessary.


Lighting and photographing LEDs (esp surface mount!) is a challenge. Some notes for next time:

]]>
Jesse Seay
tag:blog.jesseseay.com,2013:Post/896869 2015-08-30T16:09:33Z 2023-01-20T20:46:44Z Superba Second Yarn Guide

I recently had a lovely visitor from Germany, who came bearing knitting machine gifts. Katrin Kennedy (Ravelry user Rumpletasch) was in Chicago for work, and lucky me! she brought along some hard-to-find Superba parts for me. Here she demonstrates how to use the Superba Second Yarn Guide, a separate plate that hooks onto the carriage to hold a contrast yarn for jacquard. Read more for a step-by-step.

]]>
Jesse Seay
tag:blog.jesseseay.com,2013:Post/890349 2015-08-06T07:28:36Z 2015-08-06T07:28:36Z eTextile Summer Camp 2015

eTextiles summercamp 2015, at Paillard Centre d’Art Contemporain & Résidence d’Artistes.

gallery exhibition during camp


knitted wire pieces: two visitors try out my "heart beat collar"; Claire Williams' "knitted antennas".


late night work sessions


]]>
Jesse Seay
tag:blog.jesseseay.com,2013:Post/889394 2015-08-03T11:40:45Z 2015-09-03T15:30:28Z Machine Knit With Wire

I've been working on a method to machine knit with copper wire, for creating eTextiles.

the challenge:

  • wire needs to come off the spool with zero drag
  • 30-36 AWG magnet wire is super thin and breaks easily, also tangles
  • magnet wire spools are heavy, which means inertia and momentum if the spool spins, which will snap or tangle the wire.
  • it's got to be cheap

the solution (so far):
  1. place the spool on the floor in front of the machine
  2. mount a wisker disk on the top of the spool
  3. place a guide hoop above the spool for the wire to pass through
  4. attach a light-weight rope thimble to the tension mast, to minimize bending of the wire

things to improve:
a better stand
experiment with larger rope thimbles (maybe 3D print?)


I based this design on industrial coil winding methods. For instance:
 

This research has been a part of my Public Engagement Maker Residency at UIC/Mana Contemporary, working with Professor Sabrina Raaf. Also, props to Ed Bennett, for pointing out the tension mast wire-bending issue.
]]>
Jesse Seay
tag:blog.jesseseay.com,2013:Post/877550 2015-07-10T19:58:00Z 2016-01-16T06:33:30Z 50 Ways to Love Your Linker

I recently found a Brother KA-8310 linker for $35 on eBay ("working condition"!). I hear these things break more than work, but for the price, I figured, why not? The linker arrived, in clean condition, with original packaging and manual. I knitted up a test swatch, followed the instructions and.... sure enough, it didn't work. Parts moved when I turned the crank, but it did not advance on the bed of my Brother 940.

Then I realized my mistake. I hadn't let Dan tinker with it first.

So, I brought it home, set the box in front of him, and said, "Wanna fix this?" He picked up a screwdriver and I grabbed my camera. (Thus began another romantic evening at home...)

]]>
Jesse Seay
tag:blog.jesseseay.com,2013:Post/879521 2015-07-10T18:26:21Z 2016-08-30T15:40:09Z Yeoman Yarn Samples

Color cards scanned on an Epson flatbed scanner, with a CameraTrax 24 Color Card for reference.

]]>
Jesse Seay
tag:blog.jesseseay.com,2013:Post/875857 2015-07-04T18:17:49Z 2017-04-09T22:20:46Z Superba Knitting Machine

Last month, I became the ecstatic new owner of a Superba S48, donated by Ravelry knitting machine angel fibremaniac.

This is my first Superba, and I’m thrilled to have it. I’d like to try the knitty hack. Before we get there, though, the machine needs repairs and cleaning. Lucky for us, Dan and I love taking machines apart to see how they work, and we're starting to get pretty good at it.

Deep cleaning the needles is much, much faster if you don’t turn the machine over. Just clamp the machine to a table as if to knit, and you can access the screws underneath. The screws won’t fall out once they’re loosened-- very convenient. 

To remove the needles, I used a bar magnet and was able to lift them out, ten at a time. I soaked them in denatured alcohol + balistol oil. Afterwards, I dropped each needle in its channel before putting the retaining spring back on. This is much faster than on the Passap, which requires working each needle in after the spring is in place. 

]]>
Jesse Seay
tag:blog.jesseseay.com,2013:Post/876773 2015-07-03T05:14:00Z 2015-07-11T13:13:03Z Workshop: Light up your work with DIY LEDs

July 2nd workshop at Mana Contemporary, with UIC professor Sabrina Raaf.

We'll run it again on July 9. RSVP at Eventbrite

]]>
Jesse Seay
tag:blog.jesseseay.com,2013:Post/876318 2015-07-02T04:05:45Z 2018-01-15T16:06:17Z Workshop at Mana Contemporary

]]>
Jesse Seay
tag:blog.jesseseay.com,2013:Post/868545 2015-06-11T21:35:59Z 2015-06-12T03:07:19Z Photographing Yarn Colors

Photographing my yarn samples with a Colortrax color card for reference. My thinking is, if you have a copy of the card, you can adjust your monitor to match, to see accurate yarn colors.  

I shot the pictures by setting a custom white balance with the color card, so the color is consistent.  Next time, I'll have to use manual exposure/shutter speed to insure consistent brightness, as well.

The name of the yarn is under each photo set.

Key West Karibbean Kotton Yarn in DK and Worsted weights.

Jaggerspun Heather

]]>
Jesse Seay
tag:blog.jesseseay.com,2013:Post/864121 2015-06-05T15:01:39Z 2015-06-05T15:01:39Z Artist Residencies and Workshops

Since April, I've been in residence at UIC/Mana Contemporary, as a Public Engagement Maker.

They've provided me with a fantastic studio to work in, access to the Makerspace on UIC's campus, plus the great privilege of working with UIC New Media Professor Sabrina Raaf.

On May 2, UIC featured me at their booth at the Northside Mini Maker Faire at Shurz H.S., where I demonstrated the knitting machine and showed my work (pictured above). And I'm currently working on plans for a special free series of the Women's Electronics Workshop at Mana. 

Additionally, my application for eTextile Summer Camp was accepted, and I'll be flying to France in July for this amazing week-long event, held 250km outside of Paris in the Loir Valley. I'm particularly excited about participating in the Swatch Exchange, and look forward to bringing home a large collection of e-textile samples to share.

]]>
Jesse Seay
tag:blog.jesseseay.com,2013:Post/843812 2015-04-21T01:42:27Z 2015-04-21T13:47:49Z Instructables Prize Winner

My "Knit A Working Speaker" just won second prize in the Instructables DIY Audio Contest!

Huzzah!

]]>
Jesse Seay