Wear-a-Circuit Workshop

2016-10-27-13-26-38-self-portrait

Circuit Patches are wearable circuit boards made from knitted yarn and wire. I'm doing a workshop Sunday using these. Check it out!

I use a knitting machine to make the patches, and add snap buttons with a snap press. Now the circuits can be attached to anything-- no sewing required.

Rapid prototyping for Wearables!

2016-10-27-patches-on-13-35-11

2016-10-27-3-patches-dark-13-32-00

I made these circuit patches for my upcoming workshop. Participants will receive a 3" x 5.5" knitted proto-boards in black, pink, or teal. Solder LEDs and a battery on it, and you can add lights to your clothes, just in time for Halloween.

Of course, there's lots of things beyond LEDs you could add, and I'm hoping to do workshops for interactive circuits using knitted protoboards soon.

I've made a number of circuits with this method so far, usually in black. For this workshop, we're adding some fun color: circuit-board-teal and... pink! I  couldn't resist adding 10mm gumdrop LEDs to the pink protoboard pictured above.

We'll have some of those jumbo LEDs for the workshop, but also smaller ones in blue, yellow, red, white. I've even got some color-change and flicker LEDs.

If you'd like to participate, please RSVP. Hope to see you Sunday! (Bring a shirt or a hat or a bag so you can add snaps to mount your circuit on it.)

2016-10-27-snap-press-13-44-37

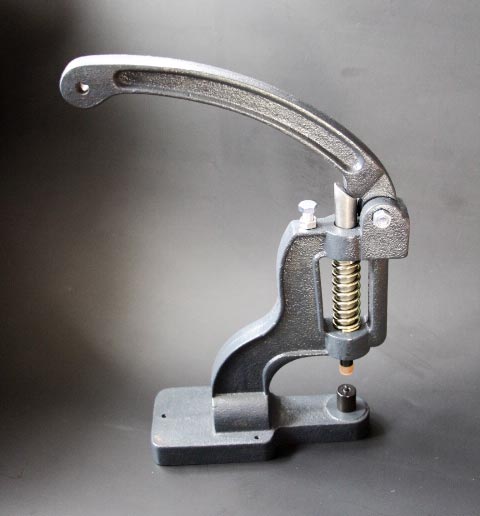
My new favorite machine: the snap press applies snap buttons without sewing.

Simple LED tricks

I created these circuits for Chicago Art Department's Crystal Ball Fundraiser Auction. The top two bidders will receive their choice of design as a custom fit cuff bracelet.

Candle flicker LEDs are an easy way to add movement to your lights, without a microcontroller.
Wire the flickering LED in parallel with non-flicker LEDs and they will alternate flickering. Make sure the different LEDs have similar forward voltages, otherwise some might not light up at all.


Slow-Fade RGB LEDs offer another easy trick, cycling through a rainbow of colors. It looks very cool set off by single color LEDs. If you limit the current enough with a high resistor, some of the LEDs will go dim at different points in the cycle.


With the above circuit, I slipped a piece of resistive velostat under the battery contact, as a dimmer. Without it, all 3 LEDs remain on, continuously.


Machine Knit With Wire


I've been working on a method to machine knit with copper wire, for creating eTextiles.

the challenge:

  • wire needs to come off the spool with zero drag
  • 30-36 AWG magnet wire is super thin and breaks easily, also tangles
  • magnet wire spools are heavy, which means inertia and momentum if the spool spins, which will snap or tangle the wire.
  • it's got to be cheap

the solution (so far):
  1. place the spool on the floor in front of the machine
  2. mount a wisker disk on the top of the spool
  3. place a guide hoop above the spool for the wire to pass through
  4. attach a light-weight rope thimble to the tension mast, to minimize bending of the wire

things to improve:
a better stand
experiment with larger rope thimbles (maybe 3D print?)


I based this design on industrial coil winding methods. For instance:
 

This research has been a part of my Public Engagement Maker Residency at UIC/Mana Contemporary, working with Professor Sabrina Raaf. Also, props to Ed Bennett, for pointing out the tension mast wire-bending issue.

The "Other" PS1

In art circles, "PS1" is a center for contemporary art in NYC. Here in the Chi-town maker community, "PS1" is short for Pumping Station: One, Chicago's oldest and largest makerspace. I've been an active member of this "other" PS1 for several years now, and I've been working on ways to both encourage and harness the community spirit that it nurtures. So I'm creating work that draws on the community model of the quilting bee, updated for an electronic age.

My circuit-knit "quilt" project started with a stack of my freshly knit circuit boards and a solder party armed with wire cutters and hot chisel tips. Afterwards, though, there was still much work to be done, and that's when a few PS1 volunteers stepped up for the long haul.

Motivated by an interest in electronics, the community of a group project, a desire to support the arts, or just straight-up generosity, Jay Hopkins, Peter, and Bandit put in some crazy hours soldering and troubleshooting the 896 LEDs, resistors, transistors, capacitors, and jumper wires that drive the piece. (For the tech curious, it's 56 flip flop circuits wired in parallel, aka blinking lights.)

PS1's vice president (and resident photographer), Everett Wilson, captured one of our late-night solder sessions. Was this the night we stayed til 4am? I can't even remember.

The finished work, Electronic Damask, is stretched on a 6'x3' frame custom built by another PS1 member and volunteer, Ray Doeksen. It's in the show No-Fi, which opens at Chicago Artists Coalition tonight, October 24, 6-9pm.


Solder Party


The past month has really been a whirlwind! I turned in my application for tenure, got the semester rolling, and pulled together my show for Chicago Artist Coalition. I'm showing a circuit-knit work that was made with the group efforts of members of Pumping Station: One. I'll post photos of the finished work soon. Here are pictures from the first step of the soldering process, the solder party I held at PS1 to get the circuit boards tinned and ready for component assembly.

(photos: Everett C. Wilson)

Work in Progress: knitted sphere

I've been busy with starting the new semester and finishing my tenure application. Getting back into the studio is a real treat! My current project: making a spherical shape from multiple segments.


With one more of these segments, I can link them all together to create a ball. I did the one on the left last night (there's the start of a repeat, but then I ran out of wire and dropped stitches, and decided to call it a night). The right one I did last week.


For this one, I started with about 40 stitches, and then started adding more once the pattern got wider.
I've noticed tension issues with the end wire stitches. To get around this, I add wire stitches on the outside of the pattern. These stitches will simply be cut off once I start soldering. (Knitted with 1 strand 36 AWG and 1 strand 34 AWG bus wire, T8)


For this one, I started with a *very* narrow swatch and just added stitches the whole way. A little tedious-- I think starting with a wider swatch may be worth the extra wire wasted. However... it worked fine. (Knitted with 2 strands 36 AWG bus wire, T8)

Also on this one (visible in the first photo) I "cast off" the wire stitches at the top, once the pattern started getting narrow. No need to knit the whole width when I only need what's inside the borders of the grey yarn.


Here's the back. I'm looking forward to finishing the third segment, getting out the soldering iron, and trimming off all that excess wire!