Recipe for Student Feedback (homemade, from scratch)


My advanced class made spring reverb units this semester. Steve and Connor stacked theirs together with a homemade tone control and a hefty dose of feedback.


Ian attached his contact mic to a jar for a duet with his sequencer. He also installed his entire rig in an old stage monitor case.


Trevor, Andy, and Brian, plus some really sweet synth.


Daniel, Rachel, Robert, and the joy of three sequencers on one clock.

Finger Sleeve Sensors

I made these knitted sleeves from a conductive yarn that changes resistance as the knit is stretched.

Jenna Boyles, Kyle Werle, and Christine Shallenberg beta-tested the sensors at Pumping Station: One. They selected sleeves for fit, then stitched on the wires themselves. Kyle and Christine were able to use the sensors to control an analog synth and a processing sketch.


Knitted Finger Sensor from Jesse Seay on Vimeo.


With this project, I wanted to design a glove that could be machine-knit for workshops cheaply and quickly, making a wearable bend sensor available to people with no textile skills.

I decided to go with a modular approach (individual sleeves instead of single glove) because:

  • gloves are not easy to knit by machine
  • fit is important, as the tightness of the knit impacts the resistance. The tighter it is, the lower the resistance.
  • there is no one-size-fits-all with gloves. individuals with the same hand width might have very differently-sized digits

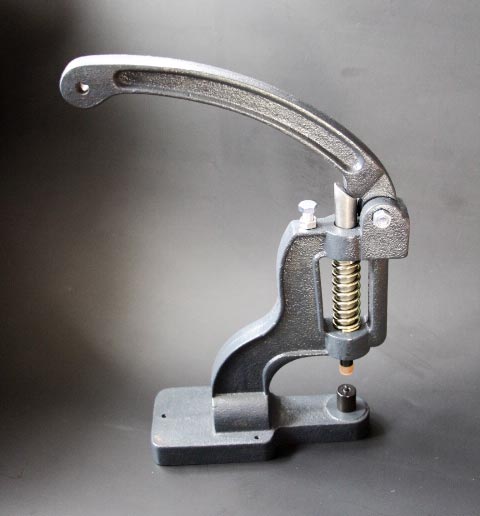
With a range of sleeve sizes, users can select the sleeve with the best fit and resistance range for each digit. We attach flexible silicone wires by means of a snap press, and the wearer then sews the wire in place with a tapestry needle and yarn -- very easy!  Transferring the sewing to the end-user means I can produce a batch of these more quickly for a workshop. Once the sleeve is finished, the user can use the tapestry needle to easily sew the wire leads in place along a fingerless glove.

Resistance varies by user. Everyone could reduce the resistance to less than 100 Ohms by curling up their finger. We were generally able to get a maximum resistance of at least 5k with a tight fit, to 20k or 30k for a more comfortable fit. The shorter the sleeve, the lower the highest possible resistance. Longer sleeves had much more range.

The sleeves are knit on a Super S48 double bed machine. Both beds are at tension 10, with a bed gap of 4. The sleeves are circular knit, with cast on/cast off using waste yarn, then finished by hand stitching. The sleeves should cover most of the finger, but are not intended to cover the fingertips.

Sizing:

Sizing has been a challenge with this project and it took some experimenting to get a useful range of sizes. For workshops, I need to be able to knit sleeves of the appropriate size ahead of time, based on a single hand measurement submitted by a participant.

I tested the sleeves for fit and resistance on a dozen volunteers at Pumping Station: One. From that, I created a sizing chart, in order to offer a range of sizes, based on hand circumference.

Wear-a-Circuit Workshop

2016-10-27-13-26-38-self-portrait

Circuit Patches are wearable circuit boards made from knitted yarn and wire. I'm doing a workshop Sunday using these. Check it out!

I use a knitting machine to make the patches, and add snap buttons with a snap press. Now the circuits can be attached to anything-- no sewing required.

Rapid prototyping for Wearables!

2016-10-27-patches-on-13-35-11

2016-10-27-3-patches-dark-13-32-00

I made these circuit patches for my upcoming workshop. Participants will receive a 3" x 5.5" knitted proto-boards in black, pink, or teal. Solder LEDs and a battery on it, and you can add lights to your clothes, just in time for Halloween.

Of course, there's lots of things beyond LEDs you could add, and I'm hoping to do workshops for interactive circuits using knitted protoboards soon.

I've made a number of circuits with this method so far, usually in black. For this workshop, we're adding some fun color: circuit-board-teal and... pink! I  couldn't resist adding 10mm gumdrop LEDs to the pink protoboard pictured above.

We'll have some of those jumbo LEDs for the workshop, but also smaller ones in blue, yellow, red, white. I've even got some color-change and flicker LEDs.

If you'd like to participate, please RSVP. Hope to see you Sunday! (Bring a shirt or a hat or a bag so you can add snaps to mount your circuit on it.)

2016-10-27-snap-press-13-44-37

My new favorite machine: the snap press applies snap buttons without sewing.

Snapshots from Japan

I spent a month in Japan this summer. Here are things I want to remember and places I want to return to.  Read on for contemporary art, textiles, craft, electronics and a makerspace. 

Simple LED tricks

I created these circuits for Chicago Art Department's Crystal Ball Fundraiser Auction. The top two bidders will receive their choice of design as a custom fit cuff bracelet.

Candle flicker LEDs are an easy way to add movement to your lights, without a microcontroller.
Wire the flickering LED in parallel with non-flicker LEDs and they will alternate flickering. Make sure the different LEDs have similar forward voltages, otherwise some might not light up at all.


Slow-Fade RGB LEDs offer another easy trick, cycling through a rainbow of colors. It looks very cool set off by single color LEDs. If you limit the current enough with a high resistor, some of the LEDs will go dim at different points in the cycle.


With the above circuit, I slipped a piece of resistive velostat under the battery contact, as a dimmer. Without it, all 3 LEDs remain on, continuously.


Passap Knitting at Pumping Station: One

IMG_0291

Aushra knits on the Passap

2015 was the year of the Donated Double Bed: two Passap Duomatics and a Superba S48. I had no experience with either brand, so it's taken awhile to get one working and online. There was cleaning and repair (tag-teamed with Dan, Erica, and Will), designing and building a worktable (thank you, Shae!), followed by the scavenger hunt for missing parts (props, Katrin and Richard!).

But I'm pleased to report it's finally happening! At a recent "Knitting Machine Office Hours" at Pumping Station: One, we tested settings that work with the Passap using fingering weight Tamm 3-ply Astracryl yarn. And we figured out how to knit from cones (no cake winding required)! Read on for a complete step-by-step.

Felting Yarn

I first knitted with Yeoman Felting Wool last summer, when Yeoman donated a large box of yarn to the eTextiles Summer Camp. It's easier to hand-felt than other wool yarns I've tried, so I ordered a half dozen colors and started to play. It's fun to make detailed colorful designs, and perfect for holiday gifts. But there are a few pitfalls in creating your design. Read on for info about:
  • holes between colors
  • uneven felting due to pattern and color
  • felting technique
Holes

The designs pictured are "single motif": the pattern does not repeat and the contrast yarn stitches are wider than 5 stitches in a row. This results in long "floats" of yarn on the back side. Normally you'd "wrap" the edge needles while you knit to avoid big gaps caused by the edge stitches "laddering." Instructions for this are often included in machine manuals under "how to knit single motif". 
The edge needles are not wrapped in this piece. This resulted in laddering: large gaps and sagging stitches at the edge of each color. This is particularly visible around the brown in the middle.

Superba Second Yarn Guide

I recently had a lovely visitor from Germany, who came bearing knitting machine gifts. Katrin Kennedy (Ravelry user Rumpletasch) was in Chicago for work, and lucky me! she brought along some hard-to-find Superba parts for me. Here she demonstrates how to use the Superba Second Yarn Guide, a separate plate that hooks onto the carriage to hold a contrast yarn for jacquard. Read more for a step-by-step.